
Litecart
Shopping cart in 1 file (with support for payment by card or cryptocurrency).
Shopping cart in 1 file (with support for payment by card or cryptocurrency).
<p align="center">
<a href="#" target="_blank" rel="noopener">
<img src="https://raw.githubusercontent.com/shurco/mycart/main/.github/media/banner.png" alt="myCart - shopping-cart in 1 file" />
</a>
</p>
<a href="https://github.com/shurco/mycart/releases"><img src="https://img.shields.io/github/v/release/shurco/mycart?sort=semver&label=Release&color=651FFF"></a>
<a href="https://goreportcard.com/report/github.com/shurco/mycart"><img src="https://goreportcard.com/badge/github.com/shurco/mycart"></a>
<a href="https://www.codefactor.io/repository/github/shurco/mycart"><img src="https://www.codefactor.io/repository/github/shurco/mycart/badge" alt="CodeFactor" /></a>
<a href="https://github.com/shurco/mycart/actions/workflows/release.yml"><img src="https://github.com/shurco/mycart/actions/workflows/release.yml/badge.svg"></a>
<a href="https://github.com/shurco/mycart/blob/master/LICENSE"><img src="https://img.shields.io/badge/License-MIT-yellow.svg"></a>
> [!Important]
> This repository is being renamed.
>The project was originally published under the name litecart. I recently received a trademark-related claim regarding the use of this name. To avoid confusion and potential legal issues, the project will continue under a new name.
>The codebase itself is not changing. Only the project name, repository name, package identifiers, and related references will be updated.
>This repository will remain available for some time with redirects and notes pointing to the new location so existing users have time to migrate.
>If your setup depends on the current repository name, please update your references once the rename is complete.
>Thank you to everyone who has used the project and contributed feedback.
> [!NOTE]
> **Disclaimer:** Not affiliated with any similarly named projects or brands.
> This is an independent open source project licensed under the MIT License.
## 🛒 What is myCart?
myCart is an open source shopping-cart in 1 file with an embedded database (SQLite by default, PostgreSQL if you prefer), a convenient dashboard UI and a simple site.
Formerly known as **litecart** (legacy project name kept here for discoverability in search).
> [!WARNING]
> Current major version is zero (`v0.x.x`) to accommodate rapid development and fast iteration while getting early feedback from users. Please keep in mind that myCart is still under active development and therefore full backward compatibility is not guaranteed before reaching v1.0.0.
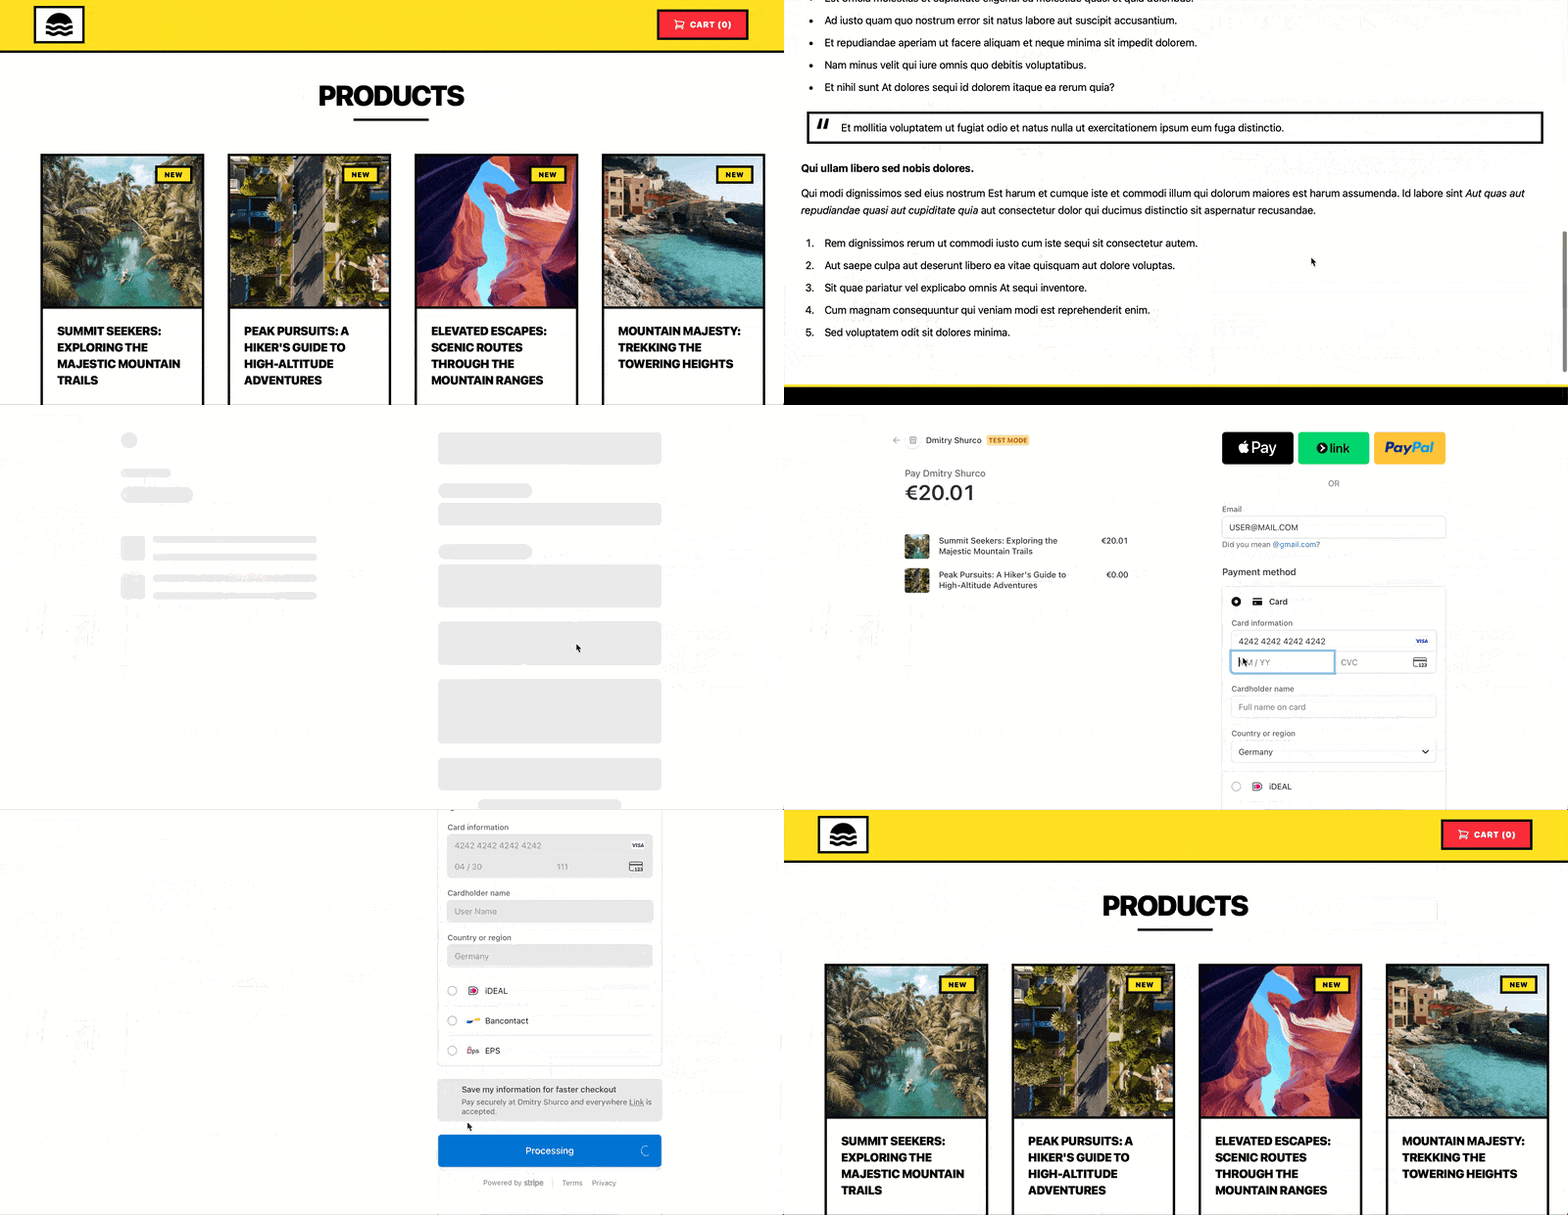
### Video Example
### Admin Panel Screenshots
<p align="center">
<img src="https://raw.githubusercontent.com/shurco/mycart/main/.github/media/screenshots/products.png" width="270">
<img src="https://raw.githubusercontent.com/shurco/mycart/main/.github/media/screenshots/product-edit.png" width="270">
<img src="https://raw.githubusercontent.com/shurco/mycart/main/.github/media/screenshots/carts.png" width="270">
<img src="https://raw.githubusercontent.com/shurco/mycart/main/.github/media/screenshots/pages.png" width="270">
<img src="https://raw.githubusercontent.com/shurco/mycart/main/.github/media/screenshots/settings.png" width="270">
</p>
## 🏆 Features
🚀 **Simple and Fast**: Enjoy a one-click installation process that gets your store up and running quickly, saving you time and effort.
💰 **Support for Popular Payment Systems**: Accept payments seamlessly with support for popular payment systems, ensuring a smooth checkout experience for your customers.
🔑 **Sell Files and License Keys**: Whether you're selling digital files or license keys, myCart has you covered, providing flexibility in the types of products you can offer.
👤 **Customer Accounts**: Buyers can register on the storefront and sign in to a cabinet that keeps everything they bought in one place — the orders, the digital files they can download again at any time and the license keys they were issued. The cabinet is opt-in, so a shop that only takes guest checkouts keeps the storefront it had.
⚙️ **Lightweight and Efficient**: myCart runs on an embedded SQLite database by default — no separate server to install, configure or keep running — which makes for a lightweight website that performs exceptionally well. If you would rather run a database server, [PostgreSQL is supported too](#-database) and is chosen when you install.
☁️ **Easily Customizable**: Modify and customize your myCart website effortlessly to match your branding and unique requirements, making it truly your own.
🖼️ **Your Own Marks**: Upload the shop's logo, favicon and tagline from the admin panel — no rebuild and no theme edit — and the storefront draws them in its header and in the browser tab. Remove a file and the built-in mark comes back.
🧞♂️ **Convenient Administration Panel**: With a user-friendly dashboard UI, myCart offers a hassle-free administration panel, allowing you to manage your store, inventory, orders and customers with ease.
⚡️ **Hardware Compatibility**: Whether you're running myCart on a powerful server or a modest hardware setup, rest assured that it will work seamlessly, providing a consistent shopping experience for your customers.
🔒 **Built-in HTTPS Support**: Prioritizing security, myCart comes with built-in support for HTTPS, ensuring the safety of your customers' data.
🔐 **Hardened Sessions**: The panel and the cabinet sign their sessions with different keys and carry them in different cookies, and every state-changing request to either surface is checked for the same origin, so a page on another site cannot ride a signed-in session. The panel is also served with `X-Robots-Tag: noindex, nofollow` and disallowed in `robots.txt`, which keeps it and its sign-in form out of search results.
🆓 **Free Products Support**: Offer free products to your customers by setting the product price to 0. Free products are automatically processed without requiring payment system integration, making it perfect for free downloads, samples, or promotional content.
🌐 **Multi-language Support**: Built-in internationalization (i18n) support allows you to create multilingual stores. myCart ships with eight languages — English, Chinese, Korean, French, Spanish, German, Italian and Belarusian — and each is listed in its own name, so the switcher reads the same whichever language is active. It is available in both the admin panel and the public site, making it easy to manage content in multiple languages and provide a localized shopping experience for your customers.
🎨 **Product Variants**: Offer products with multiple options (size, color, style, etc.) with separate inventory tracking, pricing, and SKUs for each variant. Automatically generate all combinations or manually manage specific variants with quantity and availability control.
## ⬇️ Installation
`mycart` is engineered for easy installation and operation, requiring just a single command from your terminal. Besides the conventional installation method, `mycart` can also be set up and operated via HomeBrew, Docker, or any other container orchestration tools like Docker Compose, Docker Swarm, Rancher, or Kubernetes.
#### <img width="20" src="https://raw.githubusercontent.com/shurco/mycart/main/.github/media/platforms/apple.svg"> Install on macOS
The fastest method to install `mycart` on macOS involves using Homebrew. This will install the command-line tools and the `mycart` server as a combined executable. If you don't utilize Homebrew, adhere to the Linux instructions below for `mycart` installation.
```shell
brew install shurco/tap/mycart
```
Alternately, you can configure the tap and install the package separately:
``` shell
$ brew tap shurco/tap
$ brew install mycart
```
#### <img width="20" src="https://raw.githubusercontent.com/shurco/mycart/main/.github/media/platforms/linux.svg"> Install on Linux
The most straightforward and recommended method to start using `mycart` on Unix operating systems involves installing and utilizing the `mycart` command-line tool. Execute the given command in your terminal and adhere to the instructions displayed on the screen.
```bash
curl -L https://raw.githubusercontent.com/shurco/mycart/main/scripts/install | sh
```
#### <img width="20" src="https://raw.githubusercontent.com/shurco/mycart/main/.github/media/platforms/windows.svg"> Install on Windows
The simplest and most recommended method to start using `mycart` on Windows is by installing and utilizing the `mycart` command-line tool. Execute the given command in your terminal and adhere to the instructions displayed on the screen.
```bash
curl -L https://raw.githubusercontent.com/shurco/mycart/main/scripts/install | sh
```
or download and unzip the [latest version](https://github.com/shurco/mycart/releases/latest) for Windows.
#### <img width="20" src="https://raw.githubusercontent.com/shurco/mycart/main/.github/media/platforms/docker.svg"> Run using Docker
Docker enables the management and operation of a `mycart` instance without requiring the installation of any command-line tools. The `mycart` Docker container includes all necessary command-line tools or even for server execution.
For [Docker Hub](https://hub.docker.com/r/shurco/mycart):
```bash
docker run \
-v ./lc_base:/lc_base \
-v ./lc_digitals:/lc_digitals \
-v ./lc_uploads:/lc_uploads \
-v ./site:/site \
--rm shurco/mycart:latest init
docker run \
--name mycart \
--restart unless-stopped \
-p '8080:8080' \
-v ./lc_base:/lc_base \
-v ./lc_digitals:/lc_digitals \
-v ./lc_uploads:/lc_uploads \
-v ./site:/site \
shurco/mycart:latest
```
or if use [Github Packages Hub](https://github.com/shurco/mycart/pkgs/container/mycart):
```bash
docker run \
-v ./lc_base:/lc_base \
-v ./lc_digitals:/lc_digitals \
-v ./lc_uploads:/lc_uploads \
-v ./site:/site \
--rm ghcr.io/shurco/mycart:latest init
docker run \
--name mycart \
--restart unless-stopped \
-p '8080:8080' \
-v ./lc_base:/lc_base \
-v ./lc_digitals:/lc_digitals \
-v ./lc_uploads:/lc_uploads \
-v ./site:/site \
ghcr.io/shurco/mycart:latest
```
#### <img width="20" src="https://raw.githubusercontent.com/shurco/mycart/main/.github/media/platforms/docker.svg"> Run using Docker Compose
Docker Compose provides a convenient way to manage multiple containers and services. The project includes several Docker Compose configurations for different use cases.
**Production Setup** (`docker/docker-compose.yml`):
This configuration includes the myCart application and an Nginx reverse proxy:
```bash
cd docker
docker-compose up -d
```
This setup includes:
- **mycart**: The main application container with all required volumes
- **nginx**: Reverse proxy server that listens on port 80 and forwards requests to myCart
The Nginx configuration is located in `docker/nginx/nginx.conf` and can be customized as needed.
**Development Setup** (`docker/docker-compose_dev.yml`):
For local development, you can use the development configuration which includes MailHog for email testing:
```bash
cd docker
docker-compose -f docker-compose.yml -f docker-compose_dev.yml up -d
```
This adds:
- **mailhog**: Email testing tool accessible at `http://localhost:8025` for viewing sent emails
**Combined Usage**:
To run both production and development services together:
```bash
cd docker
docker-compose -f docker-compose.yml -f docker-compose_dev.yml up -d
```
**Initialization**:
Before starting the services, initialize the application:
```bash
docker-compose run --rm mycart init
```
**First-time admin account** (choose one):
1. Open `http://localhost/_/install` in your browser and complete the setup wizard.
2. Or create the admin account non-interactively (works in scratch-based images without a shell):
```bash
docker-compose run --rm mycart install \
--email admin@example.com \
--password 'YourSecurePass' \
--domain localhost
```
Add `--db postgres --db-dsn 'postgres://…'` to install into PostgreSQL instead; see [Database](#-database).
For Kubernetes, run a one-shot Job with the same `install` command and the same volume mounts as the main Deployment.
**Environment Variables**:
The docker-compose setup supports environment variables for domain and email configuration:
```bash
DOMAIN=example.com ADMIN_EMAIL=admin@example.com docker-compose -f docker/docker-compose.yml up -d
```
Alternatively, create a `.env` file in the `docker/` directory:
```bash
DOMAIN=example.com
ADMIN_EMAIL=admin@example.com
```
**Stopping Services**:
```bash
docker-compose down
```
#### <img width="20" src="https://raw.githubusercontent.com/shurco/mycart/main/.github/media/platforms/k8s.svg"> Run using Kubernetes
An example manifest for running on Kubernetes can be found in the `/k8s/` folder (thanks <a href="https://github.com/vuisme" target="_blank">@vuisme</a>)
## 🗄️ Database
myCart supports two databases and asks which one to use when you install it. **SQLite is the default**, and staying on it
is a no-op: an existing installation keeps its `./lc_base/data.db` and nothing about it changes.
| | SQLite (default) | PostgreSQL |
|---|---|---|
| Setup | none — a file in `./lc_base` | a server you run yourself |
| Backups | copy `./lc_base` | `./mycart db backup` / `db restore` |
| Concurrent writers | one at a time | many |
| Best for | a single small shop, a VPS, a laptop | many writers, managed backups, an existing DBA |
### Choosing PostgreSQL at install time
In the setup wizard (`/_/install`) pick **PostgreSQL**, enter the connection string, press **Test connection** and then
install. The whole wizard can be driven from the command line instead:
```bash
./mycart install \
--email admin@example.com \
--password 'YourSecurePass' \
--domain example.com \
--db postgres \
--db-dsn 'postgres://mycart:secret@db.example.com:5432/mycart?sslmode=disable'
```
The choice is written to `./lc_base/config.json` (mode `0600`, it holds the password) and every later command — `serve`,
`migrate`, `update` — reads it from there.
### Choosing the database outside the wizard
`--db` / `--db-dsn` on the command line, or the `MYCART_DB_DRIVER` / `MYCART_DB_DSN` environment variables, take
precedence over `config.json`:
```bash
MYCART_DB_DRIVER=postgres \
MYCART_DB_DSN='postgres://mycart:secret@db.example.com:5432/mycart?sslmode=disable' \
./mycart serve
```
A database configured this way is *fixed*: the install wizard reports it as locked and refuses to install somewhere
else, because quietly connecting to a different database than the operator asked for is never right.
### Notes for PostgreSQL
* The connection string may be a URL (`postgres://…`) or `key=value` pairs. `timezone=UTC` is added
automatically; myCart stores timestamps without a time zone and refuses to start on a session that is not UTC,
since it would otherwise shift every stored date by the server's offset.
* `pool_max_conns` and the other `pgxpool` options are rejected with a message pointing at
`MYCART_DB_MAX_OPEN_CONNS`, `MYCART_DB_MAX_IDLE_CONNS` and `MYCART_DB_CONN_MAX_LIFETIME`. Behind PgBouncer, use
transaction pooling mode.
* The schema is created and kept up to date by `./mycart migrate`, on either database. Migrating an empty database
is all the setup PostgreSQL needs.
* `./mycart db backup`, `db restore` and `db copy` move data between a file and a PostgreSQL database; see
[Backups](#backups) and [Moving an existing shop onto PostgreSQL](#moving-an-existing-shop-onto-postgresql).
### Backups
* **SQLite** — stop the container (or let it run; WAL keeps the copy consistent) and copy `./lc_base`, as before.
* **PostgreSQL** — `./mycart db backup`, which writes one file holding every row of the cart:
```bash
./mycart db backup --out mycart-2026-09-12.sql.gz
```
The file is plain SQL — a `COPY` section per table, in the order the foreign keys require — so it can be read,
grepped, diffed and replayed by `psql`. Restoring replaces the contents of the target:
```bash
./mycart db restore --from mycart-2026-09-12.sql.gz
```
`db restore` migrates the target first, empties it, loads the dump and checks the row count of every table, all in
one transaction: a dump that is truncated or does not fit the schema leaves the database exactly as it was. A
database that already holds an installation is **refused** unless `--force` is given, because restoring into it
erases the shop that is in there. The file's own header records when it was taken and from which myCart version.
`pg_dump` works too, as it does for any application, but the file it writes can only be restored into this
database by `pg_restore` — the built-in dump is what `db copy` and the restore verification understand.
`./lc_base` still matters on PostgreSQL, but only for `config.json` — the database itself no longer lives there.
Together with the database, back up `./lc_uploads` (product images, and the shop's own logo and favicon),
`./lc_digitals` (sellable files) and `./site`, which are files rather than rows.
### Moving an existing shop onto PostgreSQL
A cart installed on SQLite moves onto PostgreSQL in one command, also in one transaction and with the same
verification:
```bash
./mycart db copy --from ./lc_base/data.db --to 'postgres://mycart:secret@db.example.com:5432/mycart?sslmode=disable' --dry-run
./mycart db copy --from ./lc_base/data.db --to 'postgres://mycart:secret@db.example.com:5432/mycart?sslmode=disable'
```
`--from` is a SQLite file or a PostgreSQL connection string, `--to` is the PostgreSQL target and defaults to the
configured database. The target is migrated first, and the copy is refused unless it is empty or `--force` is
given. Stop the service first, keep the backup of `./lc_base` and of `./lc_uploads` / `./lc_digitals`, then point
the installation at PostgreSQL with `--db postgres --db-dsn …` (or `MYCART_DB_DRIVER` / `MYCART_DB_DSN`) and run
`./mycart serve`. The SQLite file is left untouched, so the old cart is still there to compare against and to go
back to.
## 🔄 Migrating from litecart
If you are upgrading from a version that was published under the old name **litecart**, see the **[Migration Guide](./docs/migration-from-litecart.md)** for step-by-step instructions covering binary, Docker, Docker Compose, Kubernetes, Homebrew, and Go module updates. Your data and database are fully compatible — no schema migration is required.
## ⬇️ Updating
> [!WARNING]
> Before any update, be sure to make a backup of the *./lc_base* folder and the *./site* folder. On PostgreSQL the
> database is not in *./lc_base* any more — run `./mycart db backup` instead, see [Backups](#backups).
#### Update on macOS / Linux / Windows
The easiest way to update `mycart` to the latest version is to execute the command:
```bash
./mycart update
```
If there were changes in the database structure during the update, it is necessary to perform migration. To do this, you need to run the command from the `mycart` folder:
```bash
./mycart migrate
```
#### <img width="20" src="https://raw.githubusercontent.com/shurco/mycart/main/.github/media/platforms/docker.svg"> Update using Docker
Our mantra is to make updating a seamless experience. Simply download the new image and launch the container as you normally would. For example, if use [Docker Hub](https://hub.docker.com/r/shurco/mycart):
```bash
docker stop mycart
docker pull shurco/mycart:latest # download new image
docker rename mycart mycart-backup # do image backup
docker run \
--name mycart \
--restart unless-stopped \
-p '8080:8080' \
-v ./lc_base:/lc_base \
-v ./lc_digitals:/lc_digitals \
-v ./lc_uploads:/lc_uploads \
-v ./site:/site \
shurco/mycart:latest
```
If there were changes in the database structure during the update, it is necessary to perform migration. To do this, you need to run the command from the `mycart` folder:
```bash
docker run \
-v ./lc_base:/lc_base \
-v ./site:/site \
--rm shurco/mycart migrate
```
#### <img width="20" src="https://raw.githubusercontent.com/shurco/mycart/main/.github/media/platforms/k8s.svg"> Run using Kubernetes
An example manifest for running on Kubernetes can be found in the `/k8s/` folder (thanks <a href="https://github.com/vuisme" target="_blank">@vuisme</a>)
## 🚀 Getting started
Getting started with `mycart` is as easy as starting up the `mycart` server
Default run for Linux/macOS:
```bash
./mycart serve
```
For Windows:
```
mycart.exe serve
```
When launched for the first time, necessary folders will be created in the directory with the executable file. The default links for access are:
- [http://localhost:8080](http://localhost:8080) - website
- [http://localhost:8080/_/](http://localhost:8080/_/) - control panel
- [http://localhost:8080/signin](http://localhost:8080/signin) - buyer sign-in, once customer accounts are enabled
If you need to run on a different port, use the flag `--http`:
```
./mycart serve --http 0.0.0.0:8088
```
> [!NOTE]
> Ports <= 1024 are privileged ports. You can't use them unless you're root or have the explicit permission to use them. See this answer for an explanation or wikipedia or something you trust more. Use:
> **sudo setcap 'cap_net_bind_service=+ep' /path_to/mycart**
## 📚 Commands
Usage:
```
./mycart [command] [flags]
```
Available commands:
```
install Installs the cart (admin account, domain, database)
init Creating the basic structure
migrate Migrate on the latest version of database schema
serve Starts the web server (default to 0.0.0.0:8080)
update Updating the application to the latest version
db Backup, restore and copy the database
```
Global flags `./mycart [flags]`:
```
-h, --help help for mycart
-v, --version version for mycart
--db string database to use: sqlite or postgres
--db-dsn string database connection string
```
`--db` and `--db-dsn` apply to every command that touches the database and override `lc_base/config.json`.
Serve flags `./mycart serve [flags]`:
```
--http string server address (default "0.0.0.0:8080")
--https string https server address (auto TLS)
--no-site disable create site
```
Install flags `./mycart install [flags]`:
```
--email string admin email address
--password string admin password (6-72 chars)
--domain string public store domain (default "localhost")
```
Add `--db postgres --db-dsn 'postgres://…'` to create the installation in PostgreSQL instead of SQLite; see
[Database](#-database).
`db` carries the three subcommands that move a cart between a file and a database — see [Backups](#backups) and
[Moving an existing shop onto PostgreSQL](#moving-an-existing-shop-onto-postgresql):
```
./mycart db backup [--out file.sql.gz] write a dump of the PostgreSQL database
./mycart db restore --from file.sql.gz replace the PostgreSQL database with a dump
./mycart db copy --from <source> [--to <target>] [--dry-run] [--force]
```
## 🏦 Adding payment systems
#### Stripe
Stripe is a popular payment system that allows you to accept online payments from customers. It provides various tools and APIs for processing payments, including the ability to accept credit and debit cards, digital wallets, and bank transfers. Stripe ensures payment security, currency processing, and support for various payment methods.
To obtain the Secret key in Stripe, follow these steps:
1. Log in to your <a href="https://dashboard.stripe.com" target="_blank">Stripe account</a> on the official Stripe website. If you don't have an account, <a href="https://dashboard.stripe.com/register" target="_blank">register</a> for one.
2. In the top right corner, select the <a href="https://dashboard.stripe.com/developers" target="_blank">Developers section</a>.
3. In the dropdown menu, choose "<a href="https://dashboard.stripe.com/apikeys" target="_blank">API Keys</a>".
4. In the "Standard keys" section, you will find your "Secret key".
> [!WARNING]
> Please note that the "Secret key" is confidential information that should be kept secure.
#### PayPal
PayPal is an online payment system that allows individuals and businesses to send and receive money over the internet. It enables payments for goods and services, as well as transfers between users. PayPal provides a secure and convenient way to make electronic payments.
To obtain a Client ID and Secret Key for using the PayPal API, you need to follow these steps:
1. To use the API, you will need a PayPal business account.
2. Go to the <a href="https://developer.paypal.com/" target="_blank">PayPal Developer</a> website and sign in with your PayPal business account credentials.
3. In the Dashboard, find the "My Apps & Credentials" section and create a new application by clicking the "Create App" button.
4. On the application page, you will see your Client ID. It will be visible immediately after creating the application. To see the Secret Key, click on the "Show" button under the "Secret" label.
> [!WARNING]
> Please note that the "Secret key" is confidential information that should be kept secure.
#### SpectroCoin
<a href="https://spectrocoin.com/en/invite?referralId=b2n87748" target="_blank">SpectroCoin</a> is a payment system and cryptocurrency wallet that allows users to send and receive payments in various currencies, including cryptocurrencies such as Bitcoin, Ethereum, and others. It also offers currency exchange operations between different currencies and the ability to deposit and withdraw funds to bank accounts. <a href="https://spectrocoin.com/en/invite?referralId=b2n87748" target="_blank">SpectroCoin</a> ensures the security of payments and cryptocurrency storage, as well as offering additional features such as debit cards.
To obtain a "Merchant ID", "Project (API) ID" and "Private key" in <a href="https://spectrocoin.com/en/invite?referralId=b2n87748" target="_blank">SpectroCoin</a>, follow these steps:
1. Register on <a href="https://spectrocoin.com/en/invite?referralId=b2n87748" target="_blank">SpectroCoin</a> if you don't have an account yet.
2. Log in to your <a href="https://spectrocoin.com/en/invite?referralId=b2n87748" target="_blank">SpectroCoin</a> account.
3. Go to the "Business" section in the navigation menu.
4. Navigate to the "New project" section in the navigation menu.
5. Fill in the project name and make sure to enable the "Public key" section. A window with a "Private key" will appear, copy and save it. You can activate other options if needed.
6. After filling in the details, you will be redirected to the projects page. Go to the created project and in the header, copy the "Merchant ID" and "Project (API) ID".
> [!WARNING]
> Please note that creating a project may require you to complete the verification process for your <a href="https://spectrocoin.com/en/invite?referralId=b2n87748" target="_blank">SpectroCoin</a> account.
> Please note that the "Private key" is confidential information that should be kept secure.
#### Coinbase
Coinbase Commerce is a cryptocurrency payment platform that allows businesses to accept payments in various cryptocurrencies including Bitcoin, Ethereum, Litecoin, and many others. It provides a simple and secure way to integrate crypto payments into your store.
To obtain an API Key for using the Coinbase Commerce API, follow these steps:
1. Create or log in to your <a href="https://commerce.coinbase.com" target="_blank">Coinbase Commerce</a> account.
2. Navigate to the **Settings** section.
3. Under the **API Keys** tab, click **Create an API Key**.
4. Copy the generated API Key and save it securely.
> [!WARNING]
> Please note that the "API Key" is confidential information that should be kept secure.
#### Dummy Payment
Dummy Payment is a built-in payment provider that comes pre-configured with myCart. It is designed for processing free products (products with a price of $0) and does not require any external payment system integration or API keys.
**How it works:**
- Automatically activated when a customer's cart contains only free products (total amount = $0)
- No payment processing occurs - orders are immediately marked as paid
- Customers only need to provide their email address to complete the checkout
- Perfect for free downloads, samples, promotional content, and lead generation
**Key features:**
- **No configuration required**: Works out of the box, no setup needed
- **No API keys needed**: Unlike other payment providers, Dummy Payment doesn't require any external accounts or credentials
- **Instant processing**: Orders are processed immediately without waiting for payment confirmation
- **Full feature support**: All standard features work with Dummy Payment, including email delivery, digital file downloads, license keys, and webhooks
**When to use:**
- Selling free products or samples
- Offering promotional content
- Collecting email addresses for lead generation
- Testing the checkout process during development
> [!NOTE]
> Dummy Payment is only used for carts containing exclusively free products. If a cart contains both free and paid products, customers must use a regular payment system (Stripe, PayPal, or SpectroCoin) to complete the purchase.
## 🆓 Free Products
myCart supports free products, allowing you to offer digital content, samples, or promotional materials at no cost to your customers.
### Creating Free Products
To create a free product:
1. In the admin panel, navigate to **Products** and create a new product
2. Set the **Amount** field to `0` (zero)
3. The product will automatically display as "free" in both the admin panel and on the website
### How Free Products Work
- **Automatic Processing**: When a customer adds only free products to their cart (total amount = 0), the checkout process automatically uses the built-in **Dummy Payment** provider (see [Dummy Payment](#dummy-payment-built-in) section for details)
- **No Payment Required**: Free products bypass all external payment system integrations - customers can complete their purchase with just an email address
- **Instant Access**: After checkout, customers immediately receive access to free products via email, just like paid products
- **Mixed Carts**: If a cart contains both free and paid products, customers must use a regular payment system (Stripe, PayPal, or SpectroCoin) to complete the purchase
### Use Cases
Free products are perfect for:
- Free downloads and samples
- Promotional content and giveaways
- Trial versions of digital products
- Free resources and documentation
- Lead generation (collecting email addresses)
### Technical Details
- Free products are identified by `amount = 0` in the database
- The **Dummy Payment** provider is automatically selected for carts with `amountTotal = 0`
- All standard features work with free products: email delivery, digital file downloads, license keys, and webhooks
- Free products are included in order history and cart management just like paid products
- No external payment processing occurs - orders are immediately marked as paid when using Dummy Payment
## 👤 Customer accounts
A buyer does not need an account to shop: an email address at checkout is still all it takes to pay and to receive
what was bought. An account adds a place to find it again — sign in and everything ever bought with that address is
there, with the files ready to download a second time and the license keys the order claimed.
The cabinet is **off on a fresh installation**, so a shop that only ever sells to guests is not handed a sign-in form
it never asked for. It is turned on in the panel's **Settings → Customers** page (titled *Customer accounts*):
- **Enable customer accounts** — while this is off, the storefront draws no cabinet link and every address under
`/api/customer` answers `404`, exactly as if the feature did not exist. The routes stay registered either way, so
the switch takes effect on the next request rather than on the next restart.
- **Session lifetime** — how long a signed-in buyer stays signed in, in days: 1 to 365, 30 by default.
With it on, the storefront gains three pages and the header carries a **MY PURCHASES** link:
| Page | What it is |
|---|---|
| `/signup` | Create an account: an email address, a password of at least 8 characters (at most 72 bytes, which is where bcrypt stops reading) and an optional name. |
| `/signin` | Sign in. An unknown address, a wrong password and a blocked account are all answered with the same message, so the form says nothing about which addresses are registered. |
| `/account` | Everything the buyer owns: the orders with their dates and amounts, a download link for every file of a purchased product, and the license keys this order claimed. |
An account is not needed for the orders made before it existed. Purchases are looked up **by the address the buyer
typed at checkout**, so someone who paid as a guest and registers later with the same address finds those orders
waiting in the cabinet.
> [!NOTE]
> A customer account and the admin account are two different identities. They are stored apart, signed with different
> keys and carried in different cookies, and a buyer's session is never accepted by the admin API — signing in on the
> storefront cannot open the panel.
### Managing customers in the panel
**Customers** in the panel's main menu lists every buyer the shop knows: the accounts that were registered, and the
addresses that have ever paid. A buyer who never registered appears as a **Guest**, with no account actions to
offer — there is nothing to block, reset or delete, and the row says so rather than pretending otherwise.
Each row carries what the shop cares about: how many purchases the address has made, how much it spent, in which
currency, and when it last ordered. The list searches by email or name, can be narrowed to accounts only, and opens a
drawer per customer with the full order history. What the drawer offers depends on whether there is an account behind
the row:
- **Block / Unblock** — a blocked buyer cannot sign in, and their open sessions end with the block.
- **Reset password** — issues a new password and shows it **once**: only its hash is stored, so it cannot be
recovered later, and it is not emailed. The buyer's open sessions end with the change.
- **Delete account** — removes the account. What the buyer paid stays in the shop's records, where the order history
still names the address.
## 🖼️ Branding
The shop's own marks are set in **Settings → Branding**, without a rebuild and without editing the theme:
- **Logo** — drawn in the storefront header, at its own aspect ratio: the file is served as it is, so scale it before
uploading. A few hundred pixels wide is plenty. While no logo is uploaded, the mark the build shipped with is drawn
instead.
- **Favicon** — the icon the browser shows for the shop, in the tab and in a bookmark. A square PNG, 512×512 or so.
- **Tagline** — up to 120 characters, printed beside the logo in the header. Leave it empty to show the mark alone.
Only PNG and JPEG are accepted: an SVG would be a script the shop hands the browser on the shop's own behalf, and the
same rule governs product images. Uploading a new file removes the one it replaced, and removing a mark puts the
storefront back on the mark it was built with.
The files live in `./lc_uploads` — the marks are files rather than rows, so they are not in a database dump; see
[Backups](#backups). The storefront is handed the two addresses in the public settings and draws them under its own
origin.
## 🧩 For developers
The backend is developed in Go language. The frontend admin panel operates on SvelteKit and TailwindCSS.
There are a number of scripts (in the ./scripts folder) that simplify development:
`./scripts/golang` - Installs or updates a previously installed version of go (if needed).
`./scripts/migration` - Helps to work with migrations. For instance, the `./scripts/migration dev up` command will apply new migrations from folder ./migrations, then implement the migrations from folder ./fixtures.
`./scripts/sqlite` - Optimizes the existing database.
`./scripts/tools` - Sets up the necessary environment for development (if needed).
`./scripts/webscripts` - Updates frontend (admin + site) dependencies (SvelteKit, Tailwind) to the latest versions.
`./scripts/clear` - Removing hung golang or vite processes.
> [!NOTE]
> I recommend running the `./scripts/migration dev up` command. It will add test data to the database, which makes it easier to work with. For example, it will create products, transfer test images and create a test user for access to the admin panel:
> login - user@mail.com
> password - Pass123
#### Tests
The suite runs on the embedded SQLite database by default. To run the whole of it on PostgreSQL, start the
throwaway server the development compose file carries and point the tests at it:
```bash
docker compose -f docker/docker-compose.yml -f docker/docker-compose_dev.yml up -d pgtestdb
TEST_DB_DRIVER=postgres \
TEST_POSTGRES_DSN='postgres://postgres:password@localhost:5433/postgres?sslmode=disable' \
go test ./... -count=1
```
The `pgtestdb` service is a `postgres:17-alpine` on port 5433 whose data directory is a tmpfs and whose durability is
off: it holds nothing worth keeping, so restarting it and throwing it away both cost nothing. It is not the
`postgres` service in the same file — that one holds a real shop's data.
`TEST_POSTGRES_DSN` is an administrator connection: the tests provision their databases with
[pgtestdb](https://github.com/peterldowns/pgtestdb), which creates a role and a template database on that server and
clones a database per test. Use a dedicated test server — never one holding data you want to keep. The templates are
built once per server, so the migrations run once for the whole suite rather than once per test. The database named in
the connection string is only what the tests administer the server through, which is why `postgres` — the maintenance
database the image always creates — is enough.
The same two variables run the suite on a non-UTC database server, which is worth doing before touching anything
related to dates:
```bash
PGTESTDB_TZ=Asia/Seoul docker compose -f docker/docker-compose.yml -f docker/docker-compose_dev.yml up -d pgtestdb
```
The next `up -d pgtestdb` without `PGTESTDB_TZ` recreates the server on UTC.
#### Admin panel (frontend)
To develop the web interface of the admin panel, you need to start the myCart server (for example, execute the command from the project root `go run ./cmd/main.go serve`).
All the code is located in the folder ./web/admin. The command `cd ./web/admin && bun run dev` will start the development server for the admin panel web interface. By default, it will be available at http://localhost:5173/_/.
#### Base site (frontend)
To develop the web interface of the base site, you need to start the myCart server (for example, execute the command from the project root `go run ./cmd/main.go serve`).
All the code is located in the folder `./web/site`. The command `cd ./web/site && bun run dev` will start the Vite dev server. Run `cd ./web/site && bun run build` to produce the production bundle that the Go binary embeds via `//go:embed`.
#### Customization and Deployment
For detailed information on how to customize the site design and deploy it on a separate server with Nginx, see [Customization and Deployment Guide](./docs/customization.md).
## 🗺️ ToDo
`mycart` has a [roadmap](https://github.com/users/shurco/projects/2) and I try to work on issues in specific order and such PRs often come in out of nowhere and skew all initial planning with tedious back-and-forth communication.
- [x] Product in the form of files
- [x] Product in the form of license keys
- [ ] Product returned via API to another site (example license keys)
- [x] <a href="#stripe">Payment Stripe</a>
- [x] <a href="#paypal">Payment PayPal</a>
- [x] Payment PortOne
- [ ] Payment Square
- [ ] Payment Adyen
- [ ] Payment Checkout
- [ ] Payment via Webhook
- [x] <a href="#spectrocoin">Support for payment using crypto (SpectroCoin)</a>
- [x] <a href="#coinbase">Coinbase Commerce crypto payments</a>
- [x] Support WebHook (<a href="https://github.com/msalbrain" target="_blank">@nicksnyder</a> in <a href="https://github.com/shurco/mycart/pull/61" target="_blank">#61</a>)
- [x] <a href="#dummy-payment">Dummy Payment</a> (<a href="https://github.com/majiayu000" target="_blank">@majiayu000</a> in <a href="https://github.com/shurco/mycart/pull/261" target="_blank">#261</a>)
## 👍 Contribute
If you want to say **thank you** and/or support the active development of `mycart`:
1. Add a [GitHub Star](https://github.com/shurco/mycart/stargazers) to the project.
2. Tweet about the project [on your Twitter](https://twitter.com/intent/tweet?text=%F0%9F%9B%92%20myCart%20-%20shopping-cart%20in%201%20file%20on%20%23Go%20https%3A%2F%2Fgithub.com%2Fshurco%2Fmycart).
3. Write a review or tutorial on [Medium](https://medium.com/), [Dev.to](https://dev.to/) or personal blog.
4. Support the project by donating a [cup of coffee](https://github.com/sponsors/shurco).
You can learn more about how you can contribute to this project in the [contribution guide](https://github.com/shurco/mycart/blob/master/.github/CONTRIBUTING.md).
Leading Laravel open source e-commerce framework with multi-inventory sources, taxation, localization, dropshipping and more exciting features.